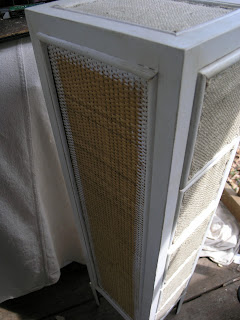
We've had this CD organizer tower furniture for many years now. It's black metal legs, rattan covered sides and drawer fronts, light colored wood and oh so lovely bamboo drawer knobs were really not cutting it. It was one of those pieces that never really fit into our decor but we needed a piece to hold our cd collection way back before digital tunes. I've almost thrown it out several times but now I'm glad I didn't. Inspired by the now trendy furniture makeovers I thought there is still hope for this piece yet...
The first thing it got was a paint job. I pulled all the drawers out and painted all the wood parts.
I then did a quick brush on with brown and then clear wax and let it dry.
Next I cut burlap to size for each side, top, and all the drawer fronts then stapled it over the rattan areas.
(Yes I do realize the sad state of my front porch, there are numerous projects going on out there at the moment because of all the wonderful warm weather! The front porch is the next big project!)
For the next step I printed out some vintage numbers in reverse and photocopied them.
I used Citrasolve to transfer the images to the burlap and then hand painted them with black chalkboard paint, I would have used regular craft acrylic but I couldn't find my bottle. The chalkboard paint was handy and worked great.
For the finishing touches I hot glued some hemp twine around the edges of the burlap to cover the staples.
Then I drilled new holes for the new handles and screwed them into each drawer.
I just love how this turned out! It's the perfect size and style for the area right next to the front door.
Go check out all the amazing projects!


