Tuesday, October 14, 2014

Vintage Window Painted Sign Tutorial...

I picked up a vintage window at a yard sale for $10. It was actually a package deal I worked out for a brand new space heater that had $15 on it and the windows had $15 on them. I gave the gal my last $20 for the heater and the window. The space heater was still sealed in the box and is worth $75, score!
But I was really excited about the window. I didn't look at it before I bought it, the side facing me was all brown wood. Then my daughter picked it up for me and when she turned it around it was painted turquoise and white, score! Sometimes things just work out lol. 

 First I made the graphic (find it free below)  in Photoshop and printed it out using the poster option on my printer so the image printed out over 4 sheets of paper.
 I then taped the printed design to the back of the window and started painting the glass, tracing over the printed lines.
Next I removed the printed design from the back of the window and painted the blue color on the back of the window to show through the outlined letters. I love the 3-D look of painting the outlines on the front of the glass that the filler blue color on the back of the glass, also when the lights are on it casts shadows of the painted letters on the wall, too neat!


 My kitchen remodel is really coming along. Yay! I'm loving it so far. :)
Have I told you how much I love my mason jar light fixture? Well in case I haven't I really do!
This is the graphic I designed, feel free to use for your personal projects or gifts but please do not sell and do come back and share what you've made when you get a chance, I really wanna see! :)

Saturday, October 11, 2014

Kitchen ideas, plans, and not so much progress...

I know I haven't been around much but I am still working on my kitchen. It's a remodel that has gotten interrupted more than once. I did finally put all my cabinet doors back up this week...I know...it's been months! But at least I'm making a little progress lol. 
I still have to paint the bottom cabinets and am psyching myself up for that. (I really hate painting). I see all these articles and websites proclaiming that painting is the easiest most inexpensive way to update your home, well I'm not a big fan, although I love the finished product I just HATE painting. Anyone else feel that way?

Anywho, my brain is wandering again and getting excited about starting another project for the kitchen. Yes yes I know I haven't finished painting yet. I got it...now onto my new project...

I saw this post by Kara Paslay...
Where she makes this backsplash out of Sculpey homemade tiles. I love it! I can't afford real tile but I can so do this. Walmart has large packs of sculpey 3 clay for under $4 and that is WAY cheaper than real tile. Especially the tile I want which is an arabesque Moroccan tile shaped like this...
But I want to do it in a matt finish white like this...
I'm totally in love with this image. I have the darker Ardex countertops and white cabinets and even the kitchen window so its really easy to imagine my kitchen turning out like this. 
I have to try this...and I want to do it so bad that I'm not going to let my self start till I finish painting the cabinets. It'll give me a little incentive to get my painters cap on.

For now I just want to do it on the one wall behind the kitchen sink, but when I'm finished I may decide to wrap it around behind the stove wall too. But that's a decision for another day. :)

I'm also reading up on making a cookie cutter from scratch so I can cut the tiles out easily and quickly instead of hand cutting each one like Kara's tutorial. Cause the fish scales I would imagine would be a lot easier to cut than these Moroccan ones.

Wednesday, August 13, 2014

Mason Jar Light Fixture...

I'm so excited! I finally got my mason jar light fixture finished! I used lots of antique canning jars, a couple of them I have never seen before. I love how it turned out. The lighting is soft because I used 4 watt nightlight bulbs inside each jar. Too cool. 

Monday, August 4, 2014

Bar front planks installed...

First of all yes, I know the sad state of this counter. We had just finished a b-b-q and everything was still out lol. But I was determined to get this project finished today. I hate the paneling under the bar top. I have been wanting to get some painted planks up there for a while but hadn't found the wood cheap enough for my cheapness lol. Until I went to a yard sale about a week ago and found a whole box of cedar closet planks. I bought them for $10, took them home, painted them and now, finally I got to put them on.
Of coarse when I finally went to start this project my air compressor wouldn't start so I spent about 20 minutes working on the motor and finally got it running. A little lubricant is all it needed. Why is it that whenever you get a fire lit under your pants to try to make some progress, everything breaks down? It's really quite annoying. But I persevered! Lol.
After priming, painting, and cutting the planks down to size I put a line of Liquid Nails down the center of each board and used my brad nailer to secure them to the paneling with three brads.  I used 5/8" brad nails since the other side of that paneling is a kitchen cabinet and I didn't want sharp nails hanging out inside my food storage area.
Much better, no? I'm loving it! And I'm still loving my Ardex Bar top. We did have a little mishap though, when my youngest tried out our new pizza cutter on the new bar top. Good thing Ardex is such an easy repair!
Now if I can just work out the kinks in my light fixture I'll be happy. I have isolated the problem though so it shouldn't be long before it's working.

Friday, May 16, 2014

Kitchen update with Ardex counters....

Alrighty I'm in the middle of painting but I just wanted to give you a quick update on the progress I'm making...
See the flowers I got for Mother's Day? Thanks Babe!

If you remember in my last post my counters didn't turn out the way I had hoped with the glaze coat so I sanded them down with coarse sandpaper...see above.
And then applied the Ardex again...two coats...sanded with fine sandpaper then resealed with an oil based polyurethane. 
They turned out perfect! I LOVE my new counters. Water just beads up on them with no problems.
I will share more pics of them when I reveal the whole kitchen soon. :)


Another progress note is that I installed the wood beam with antique cornices and ran the wires for my mason jar chandelier. It was tough work but I managed to do it all by myself, (well also with the help of some great tutorials on the web which I will link to soon) though I have to give credit to my hubby for helping me tear out the old cabinet that was there and for not giving me too much grief about having less cabinets in the kitchen.
Also perhaps you notice the ends of the cabinets have beadboard now, though this one still needs a little piece of side trim.

Anyway that's all for now. I'll be back soon. :)


Monday, May 12, 2014

Ardex countertop new direction...

I absolutely adore the texture from the troweling process, then I went to seal and decided on a gloss coat for bar tops for maximum durability. 
Love this product...4 foot plastic with tape already on it, so easy to use!
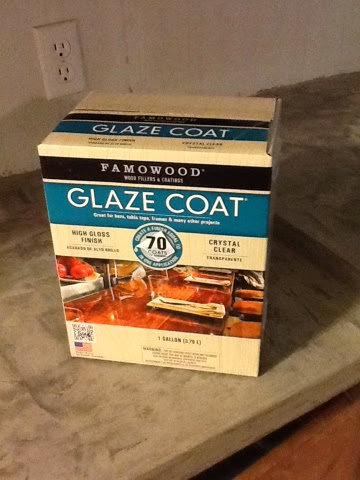
So this is what I chose to use for the sealer for my countertops. FAmowood Glaze Coat from Lowes. I figured I wanted a really good seal and this would do the trick. It did seal quite well, but...made my countertops so dark I don't like them.:( sad face. . .
Plus the glaze coat was a bit difficult to work with, it sets up super fast and the areas I had to cover were too big to do myself. Not very happy with how this particular DIY turned out. 

BUT!.....the good thing about Ardex is that it is extremely easy to work with so I'm just gonna sand that glaze coat, apply a few more thin layers of Ardex and seal it with Polyurethane to get the color and finish I want. :) I'll update in a few days and let you know how it's going. :)


Friday, May 9, 2014

Ardex countertop part 2

Continuing my post from the other day...
I have put three coats of the Ardex product on my counter using a wide concrete trowel on the first two then a much smaller 3" wide putty knife on the 3rd layer. The reason for this is that I want a really textural look to my finished countertop, possibly, hopefully a little more like stone in the end rather than flat perfect concrete. Then after the third layer was on I used the excess and now thicker Ardex that was still in my bowl and went back and smeared it on roughly here and there because it seams that the best textured results come when you sand the last layer with fine grit sand paper. The fine sandpaper has an almost polishing effect on the Ardex and it's those areas that end up darker. Or so I've read. It's all just a big experiment, I hope it turns out well. I'm sure I will love them when they are done, as I already love them now and they aren't even done yet. The hubby just wishes "yet another" project was done. He's tired of not being able to use the kitchen. Diddo!
I'm sorry the pictures aren't the greatest. I hope to update with better quality ones from my camera but for now IPad pics in early morning light are all I've got. :) hopefully you can see the smearing spots here and there to achieve maximum texture when the counter is finished.
In the process of sanding down the last layer (no I didn't waste time sanding between each and every layer) mainly because I'm going for that textured look and because I'm lazy lol. I'm using my black and decker sander first to do an overall smoothing then I'll go back with the fine grit sandpaper to get the polished effect I'm looking for in a final sanding.